Embed Your Schedule
You can put StudioBase on your own website two ways:
- Inline schedule (recommended) — your full, color-coded class schedule appears right on your page. Visitors browse it and click a class to book. This is the best fit for most studios.
- Booking button (classic) — a floating "Book a Class" button that opens a booking popup.
Inline Schedule (Recommended)
Paste these two lines where you want your schedule to appear:
<script src="https://www.studiobase.org/embed/v2.js" async></script>
<studiobase-schedule data-studio="your-subdomain"></studiobase-schedule>
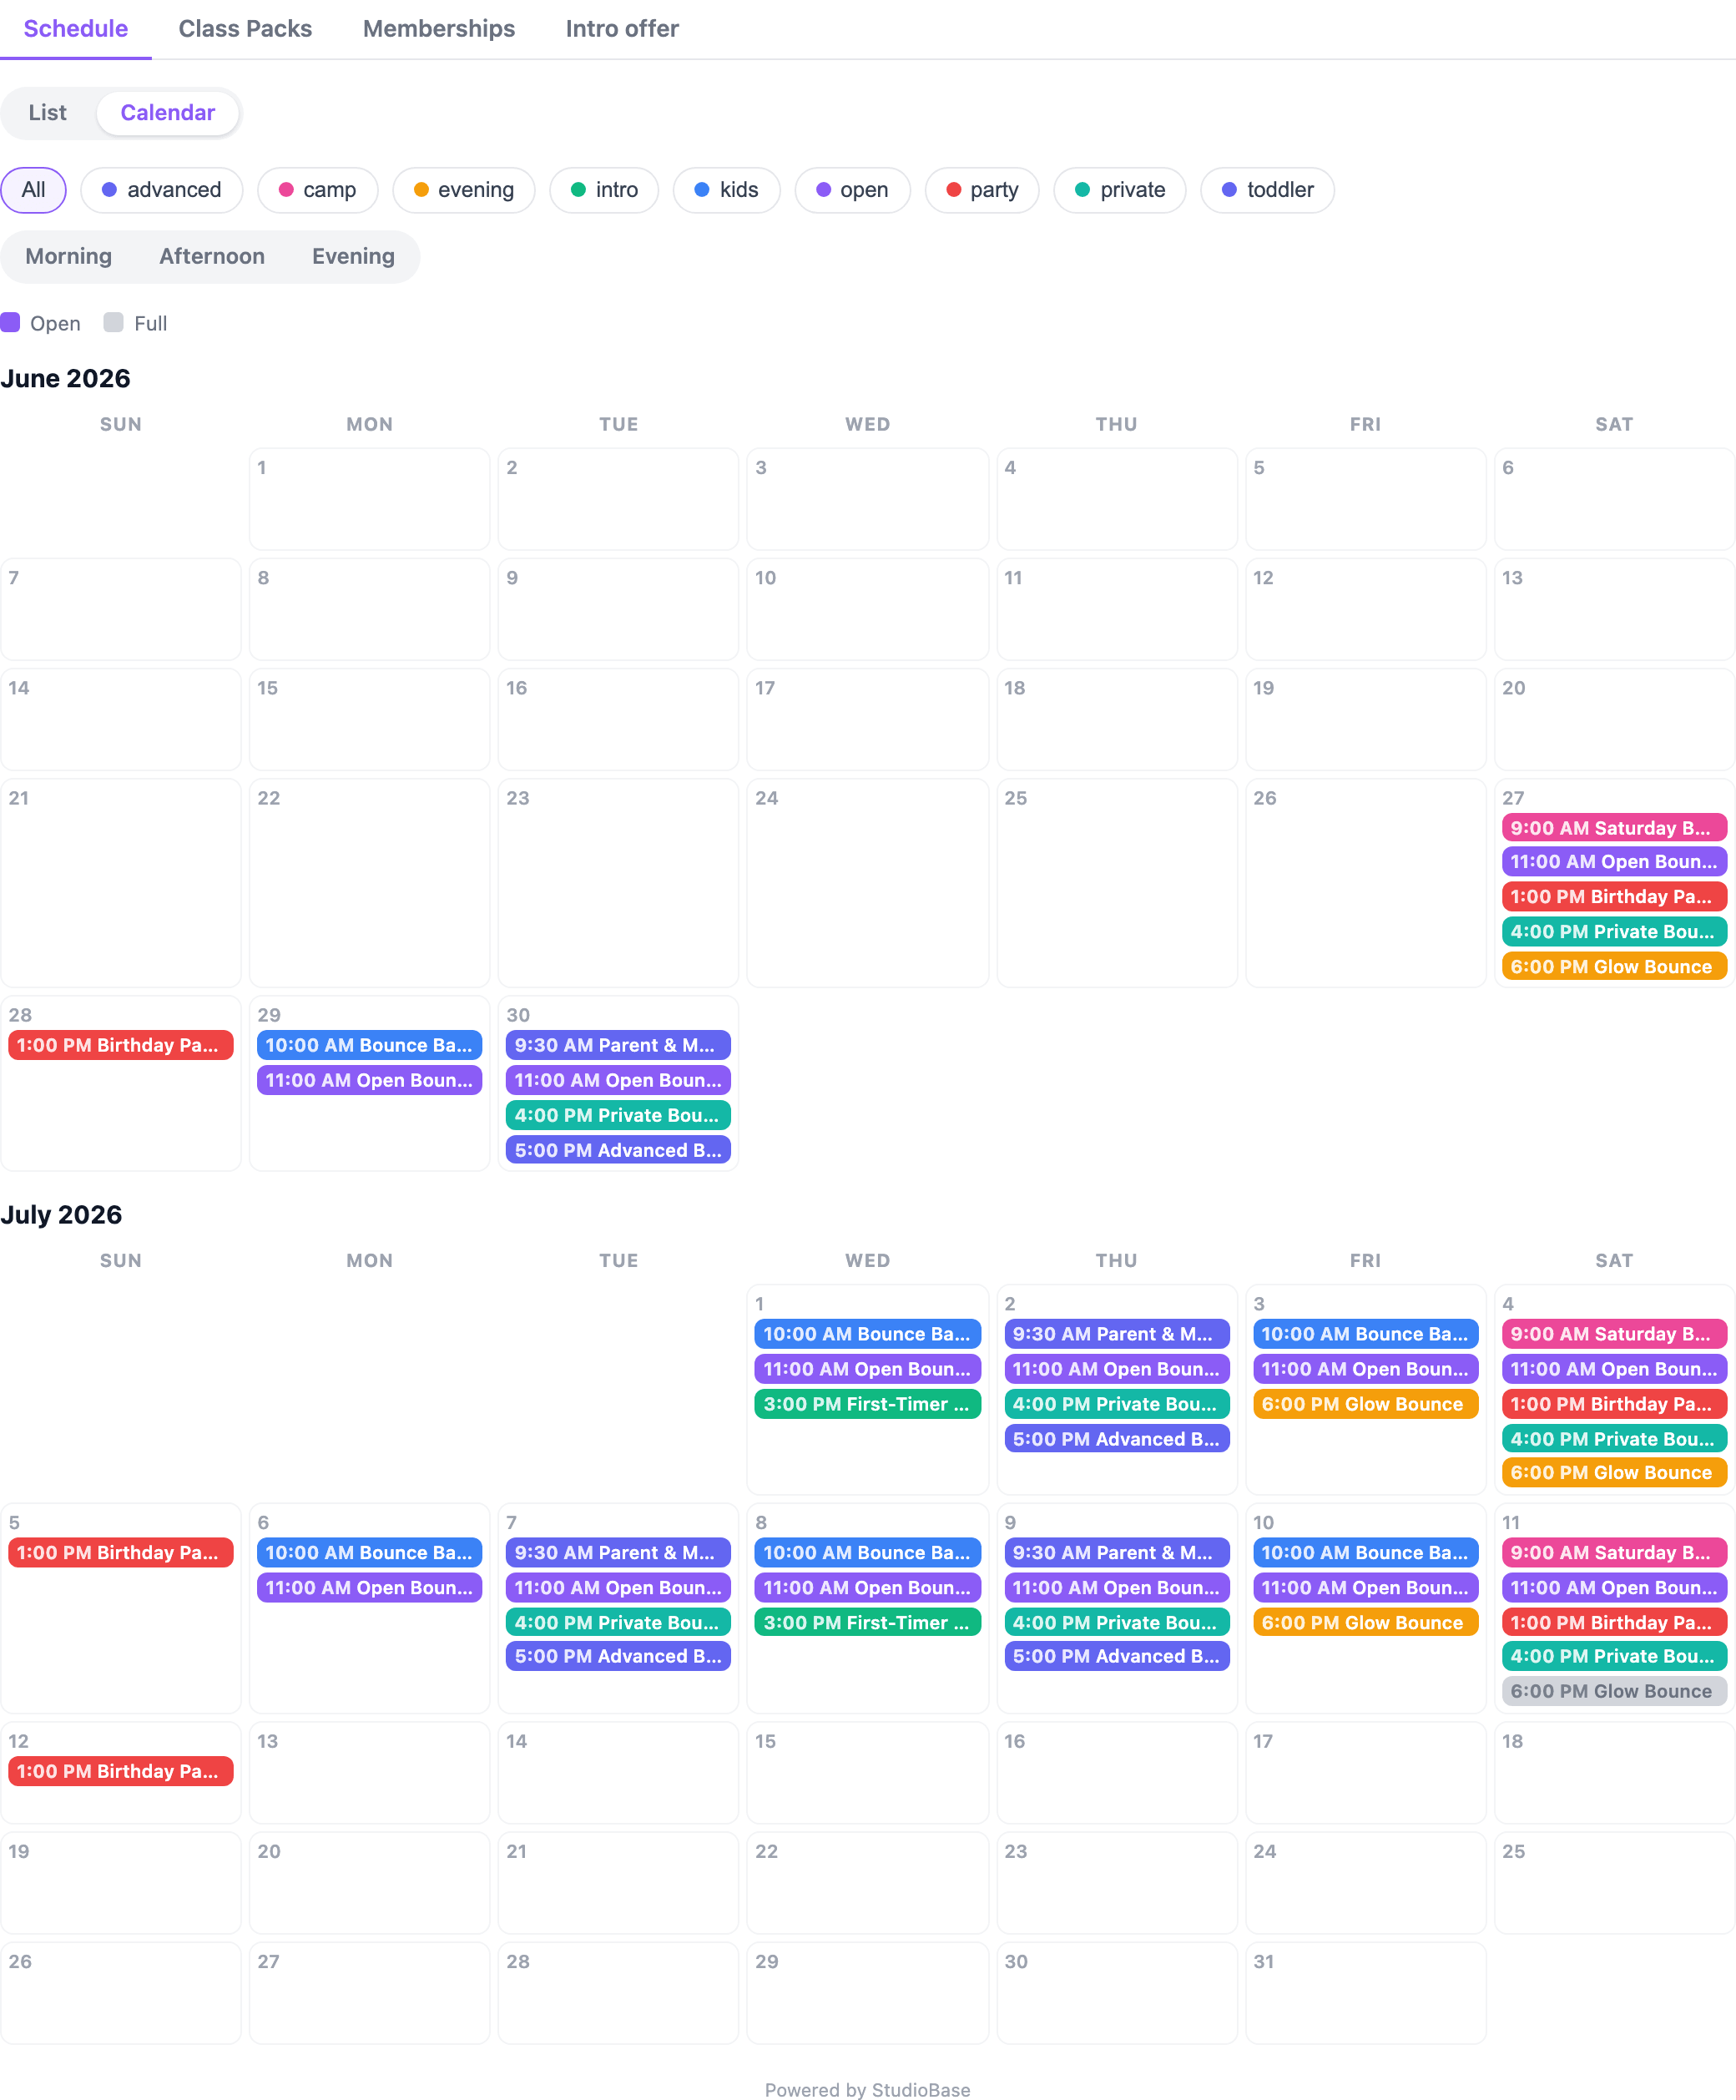
That's it. The <studiobase-schedule> element renders your live schedule inline on your page — no popup, no iframe:
- Color-coded by category, using the same colors as your StudioBase schedule
- Three layouts — a familiar list, a month-grid calendar, or by instructor (classes grouped under each instructor's photo and name). Visitors switch with the List/Calendar/By instructor toggle, and you choose which one loads first (see Embed Widget settings)
- Themed with your brand color automatically
- Filters let visitors narrow the schedule by category, by time of day (Morning / Afternoon / Evening), and — in list and by-instructor views — by a specific date
- Availability at a glance — classes that are full show greyed out, with an Open / Full legend
- Each class shows its time, instructor, price (and any active promotion), and spots left
You can also put your own headline, call-to-action button, and logo above the schedule — set these in Settings > Embed (see Embed Widget settings).
When a visitor clicks a class, it opens that class's page on StudioBase in a new tab, where they book and pay securely. Everything that involves a payment stays on StudioBase — the embedded schedule itself only ever reads your public schedule.
Section Tabs
If you offer class packs, memberships, or a new-student intro offer, the schedule leads with section tabs:
- Schedule — your inline, browsable schedule (where visitors stay to book a class).
- Class Packs, Memberships, Intro offer — each opens the matching page on StudioBase in a new tab.
Tabs appear automatically only for what you actually offer, so a studio with just a schedule sees no tab bar. Like everything else in the embed, the tabs only navigate — every purchase happens securely on StudioBase.
Placing It On Your Page
The element flows like any other block, so you can drop it inside whatever section you like — with your own heading and copy around it, and the layout of your choice:
<section>
  <h2>Our Class Schedule</h2>
  <p>Browse upcoming classes and book your spot.</p>

  <script src="https://www.studiobase.org/embed/v2.js" async></script>
  <studiobase-schedule data-studio="your-subdomain" data-view="calendar"></studiobase-schedule>
</section>
You only need the <script> tag once per page, even if you place several <studiobase-schedule> elements on it.
Already using the older button widget below? Just replace its <script> tag with the two lines above — re-pasting upgrades you to the inline schedule. The old button keeps working anywhere it's still installed, so there's no rush.
Optional Settings
| Attribute | What it does |
|---|---|
data-studio | Required. Your studio subdomain. |
data-days | How many days ahead to show (defaults to your booking window). |
data-view | Start in list, calendar, or instructor view (defaults to the view you pick in Settings > Embed). Visitors can still toggle. |
data-accent | Override the accent color with a #RRGGBB hex (defaults to your brand color). |
data-header | Set to hide to leave off your headline / CTA / logo header for this placement. |
data-filters | Set to off to hide the filter controls (category, time of day, date). |
data-category | Show only one category — pass its category ID. Combine with data-filters="off" to lock a placement to a single category with no controls. |
Styling On Your Site
The schedule renders in an isolated Shadow DOM, so your site's CSS can't accidentally break it — and it can't break your site. Your page's Content Security Policy must allow loading a script from studiobase.org and connecting to it (script-src and connect-src).
Booking Button (Classic)
The original embed adds a "Book a Class" button to your site. When visitors click it, a booking modal opens right on your page — no redirect needed.
Requirements
Before you can embed the booking widget, make sure:
- Your Stripe account is connected (Payouts)
- Your subscription is active (or you're within your free trial)
- You have at least one upcoming class on your schedule
If Stripe isn't connected yet, the embed settings page will show a setup prompt with a link to complete your Stripe onboarding.
Getting Your Embed Code
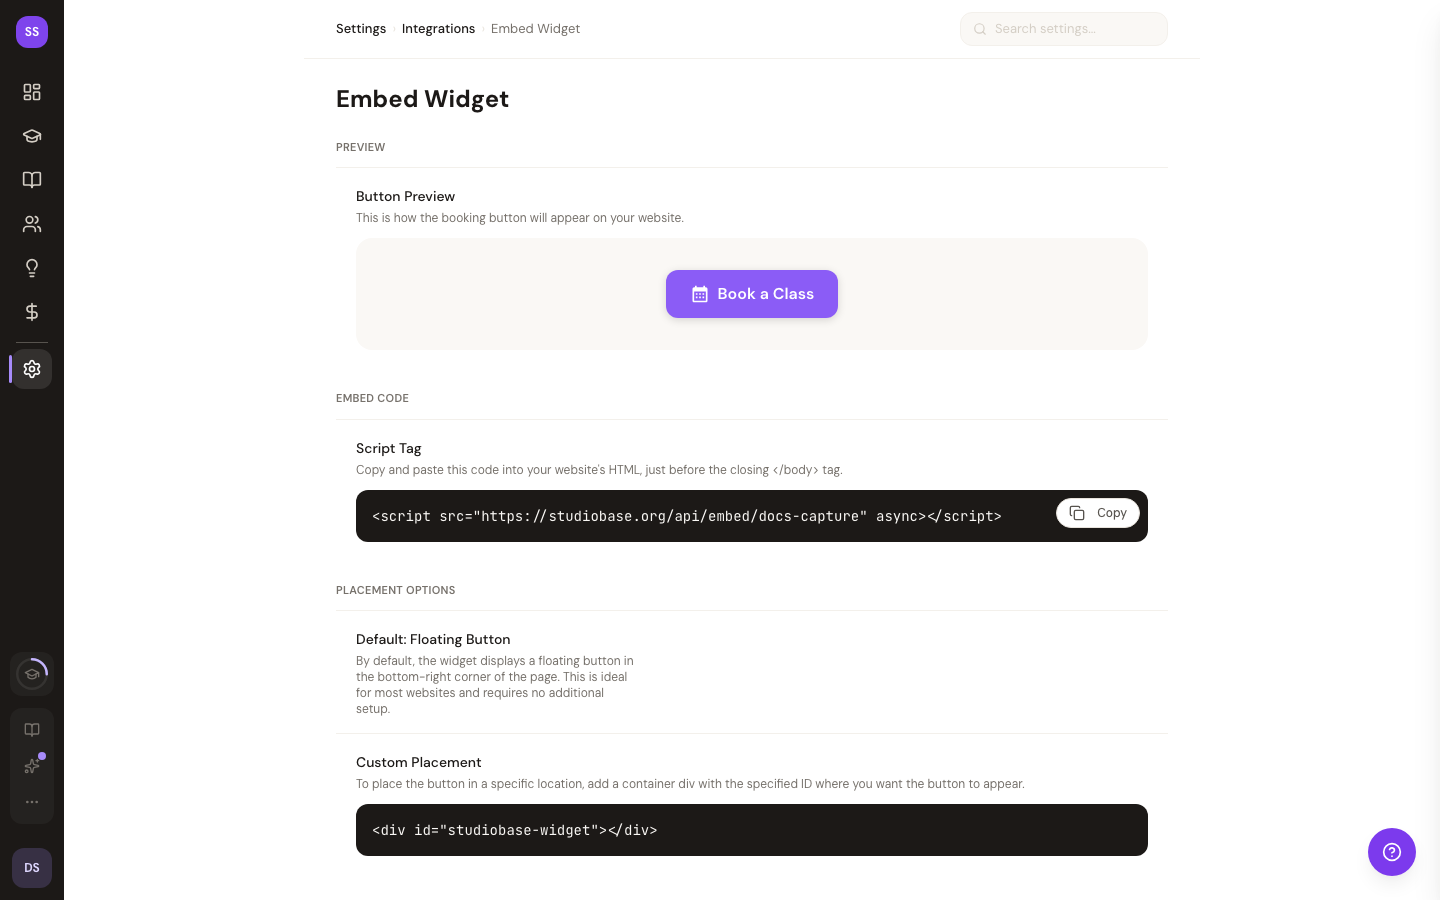
- Go to Dashboard > Settings > Embed
- You'll see your embed code — a single
<script>tag - Click Copy to copy it to your clipboard
The embed code looks like this:
<script src="https://www.studiobase.org/api/embed/your-subdomain" async></script>
Adding It to Your Website
Paste the embed code into your website's HTML, just before the closing </body> tag.
Option 1: Floating Button (Default)
With no extra setup, the widget appears as a floating "Book a Class" button in the bottom-right corner of your site. It stays visible as visitors scroll.
This works great for most websites and requires no changes to your page layout.
Option 2: Inline Placement
If you'd rather place the button somewhere specific on your page, add this HTML element where you want the button to appear:
<div id="studiobase-widget"></div>
The widget will detect this element and inject the button there instead of floating.
What Visitors See
The Button
A branded "Book a Class" button styled with your studio's brand color. The button includes a calendar icon and responds to hover and click with subtle animation.
The Booking Modal
When a visitor clicks the button:
- Class Selection — A list of your upcoming classes with available spots, showing time, name, instructor, and price
- Enter Details — The visitor enters their name and email address
- Checkout — They're taken to a secure Stripe checkout page to complete payment
- Confirmation — After payment, they see a booking confirmation
Returning visitors who've booked before will have their email pre-filled for a faster checkout experience.
Customization
The widget automatically uses your studio brand color from Settings > Branding. This color is applied to:
- The button background
- Modal accent colors
- Hover and focus states
To change the color, update your brand color in Settings > Branding — the embed widget will pick up the change automatically.
Waivers
If your studio requires a waiver, visitors will be prompted to accept it before completing their booking — just like on your main StudioBase site.
Mobile Experience
The widget is fully responsive:
- Desktop: A centered modal with your class list (420px wide)
- Mobile: A full-screen overlay that slides up from the bottom
Security
- The embed script is served over HTTPS
- Payment processing goes through Stripe's secure checkout
- No sensitive data is stored in the embedded widget
- The script is cached for 5 minutes for fast repeat loads
Troubleshooting
The button doesn't appear on my site
- Verify your Stripe account is connected and active
- Check that your subscription is active (or trial hasn't expired)
- Make sure the script tag is placed before
</body> - Check your browser's developer console for errors
The modal shows "Booking Unavailable"
- Your subscription may have expired — check Settings > Subscription
- Your Stripe account may need attention — check Payouts
No classes appear in the widget
- Make sure you have upcoming (future) classes on your schedule
- Cancelled classes won't appear
- Classes that are full won't appear
Styling conflicts with my website
- The widget uses its own isolated styles that shouldn't conflict with your site
- If you notice issues, check for CSS that targets
iframeelements globally
Need Help?
If you run into any issues setting up the embed widget, contact us at support@studiobase.org with your studio URL and a link to the page where you've added the widget.